Hallberg Rassy Rasmus 35

Hallberg Rassy Rasmus 35
An Old Classic

Thursday, August 23, 2012

Had a great week on the boat early August - didn't go that far just cruised round the Clyde as there wasn't much wind and we had commitments to sail with friends etc.. Took these Photos which I thinks shows off my local cruising waters at their best. The first is looking up the Kyles of Bute from off Rothesay and the second looks across two islands, Great Cumbrae and Bute towards a third Arran


I'd like to say its always like this round here but alas its not!

Euan
Cabatach

Sunday, August 12, 2012

Making up 1x19 ss standing rigging

I made up my standing rigging using 1/4 inch diameter 316 stainless steel wire.  Below is a pictorial/description of how I did it.

The swage end of the rigging slipped onto a 1/2 inch dowel pegged to the shop floor and numbered
The mechanical fitting end with eye slipped onto dowel pegged to floor at correct length for rigging.  I wrapped the wire with tape to mark the length right at the start of the threads on the eye.  I used Hayn Hi Mod fittings.

I used a block of wood with a 1/4 inch diameter hole drilled thru to hold the rigging wire.

Cutting the wire with jig saw or hack saw.

Sanding off the rough edges with rotary sander.


Slipping on the head of the Hi Mod fitting

Unwind, don't bend, the outer wires one at a time.


Place the inner cone on the inner wire core.

Slip the grooved washer onto the inner core of the wire.

Twist the outers wires to lay them back in place.  Stop at this point and then place the individual wires in the  a groove on the washer in order.  When all the outer wires are in a groove, rotate the washer to further lay the outers wires down tight.

This is how it should look just before screwing the eye onto the head.

Tighten the eye on the head by rotating either the eye or the head so that the one chosen will be in the direction that will not unwind the wires.


Friday, August 3, 2012

Just Added a Link to a Great Sailing Web Page

I was searching the web today and found a very nice web site with tons of great information in it about cruising.  It is Geoff Schultz Bluejacket Sailing Site.  Check it out. It is certainly worth looking over if your planning on cruising around North America.
Cheers
Pat

Monday, July 23, 2012

Beta 38 Installed in Rasmus


I hoisted the engine up and into the Rasmus today with the help from my two daughters.  It took all of 30 minutes.  It went in without a hitch. But (there is always a but isn't there) the engine is designed to sit at an angle so the four flexible engine mount bolts are also tilted on the same angle.  From what I have read that is not a good thing.  I have contacted Stan from Beta Marine to ask him what the next step is.  I am hoping he says, "Oh don't worry about that Pat, it won't cause any problems at all."  Anyway I have a couple of pics below.


I had to take the exhaust elbow off for the engine to fit in the hatch.  That was not a problem. Other than that it was a smooth operation.  Cheers.

Sunday, July 15, 2012

Electronics, Engine, and Self Steer Gear

In the last few weeks I have been busy installing electronics, getting the engine room ready for the Beta Marine 38, and finishing the CapeHorn installation.  Pics below:

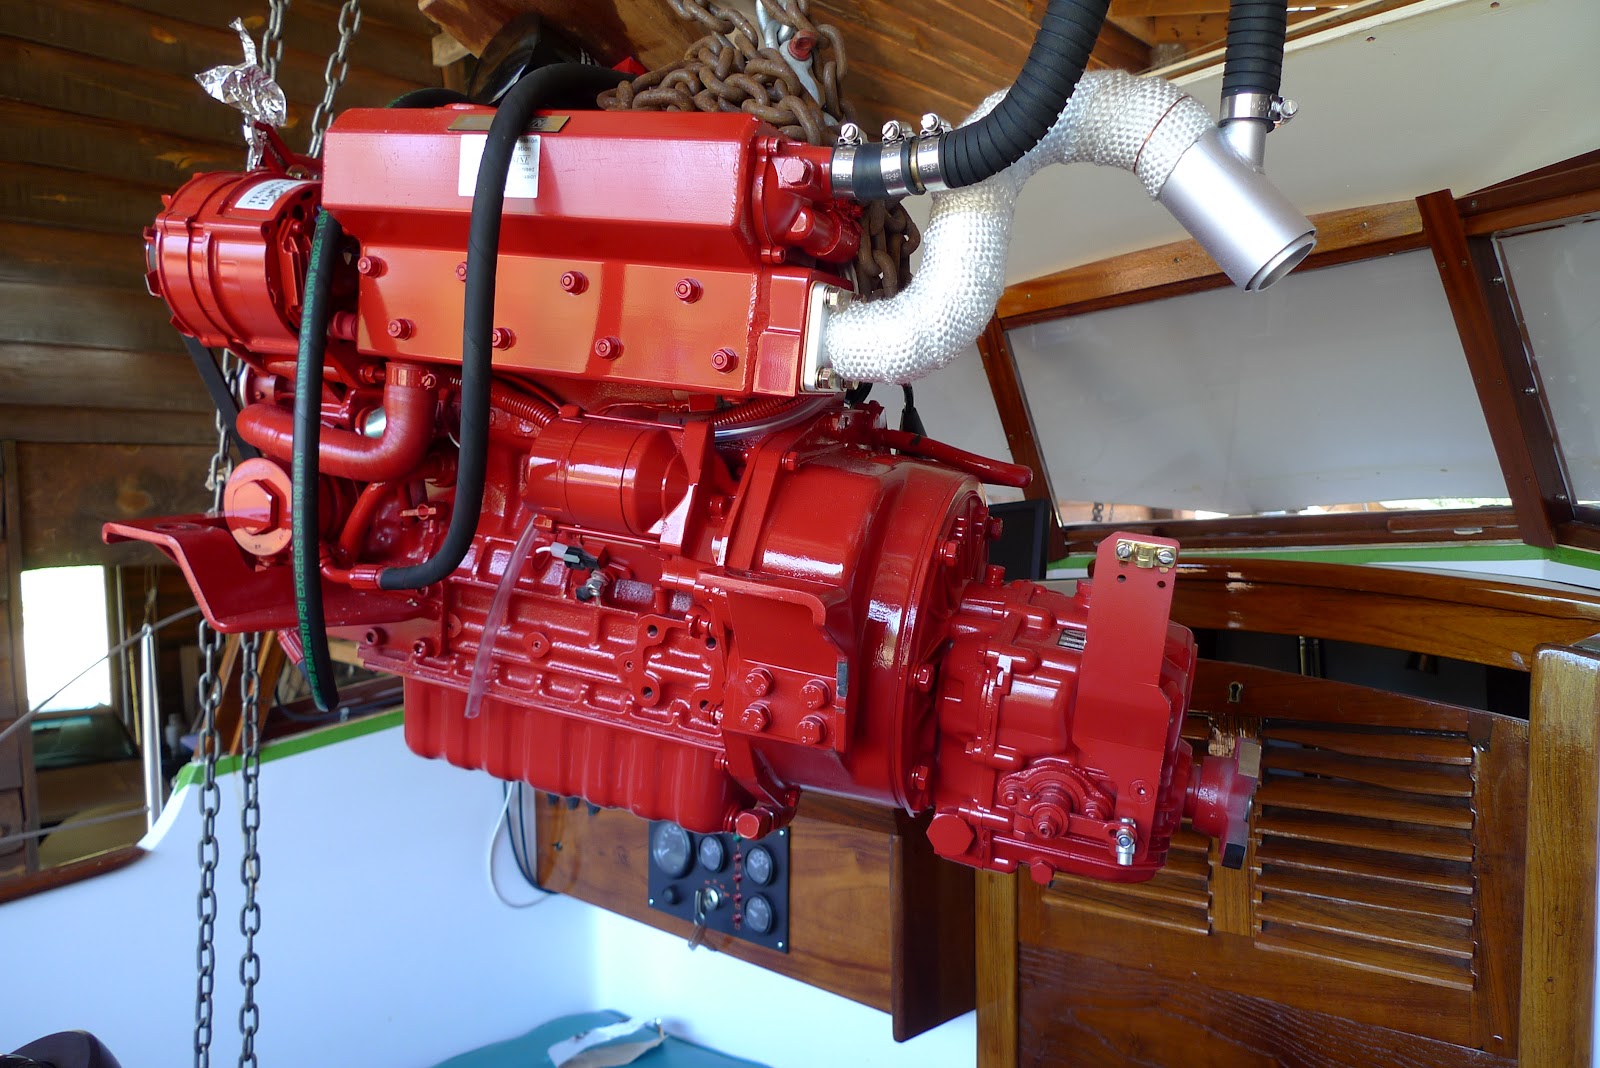
I shimmed the new engine mounts to match the originals in height with 1/2 inch aluminum plate.  I also placed a 1/16 inch thick lexan sheet between the mount and shim hoping to thwart electrolysis.  I used a generous amount of anti corrosion gel on each bolt before bolting them in place.


After installing the Soundown Sound Proofing,  I began adding the engine peripherals prior to engine installation.  Here is a Groco Raw water strainer.  I will also add a Racor fuel filter and a fuel pump to facilitate bleeding and general smooth running.  I have read that the deep fuel tank on the Rasmus can cause problems with fuel supply.

I replaced the fuel lift tubes.  The old ones were looking brittle.

I finished rigging the cape horn wind vane to the tiller handle.
Added electronics on the cockpit chart table.  From left to right: Garmin  GPS Map 182, Furuno Depth and  Fish finder, and a Lilliput 10 inch 12 volt field monitor.  This monitor is connected to my Apple Mac Mini navigation computer and it uses less than 10 volts and can be hooked directly to 12 volt system via cigarette outlet.  The other monitor is on the galley table and both monitors are mounted with RAM mounts the VESA mounts.  Both are wired to the same computer.


Wednesday, July 11, 2012

Beta Marine Engine for Rasmus

I ordered a Beta Marine 38 hp engine for this Rasmus.  It will be arriving tomorrow. I purchased custom engine mounts that should make installation easier, hopefully.  I will post comments and pictures as the work progresses.

Sunday, June 24, 2012

Vetus HTP30R steering pump

For anyone dealing with steering issues, I recently replaced my Vetus steering pump.  The new pump is the Vetus HTP3008R.  My old steering cylinder seems good so I didn't replace it at this point.  I had to bleed the lines and cylinder several times.  The first time, any pressure on the rudder during a port tack would return to center. Mounting the emergency tiller made it easy to watch the movement.  I found it was necessary to fill and bleed the lines with the cylinder in various positions before all the air was out. I couldn't be happier with the new pump.  The install was a quick easy swap.

Best wishes,  JK