
Hallberg Rassy Rasmus 35

An Old Classic
Tuesday, December 27, 2011
Rasmus Web Site and Blog Audience
Friday, December 23, 2011
2012 To do List
 |
| My first cruise in a 16 foot McKenzy River Dory along Mississippi's Barrier Islands. |
Tuesday, December 13, 2011
Inner Forestay for the Rasmus
I have been talking to Mack Sails about new sails and they have just about talked me into putting in an inner forestay for a small jib and storm sail. I kinda wanted one anyway. I have just sent them a design idea and I am waiting for a response. Here is a quick sketch I sent them to see if it is feasable.


Tiny Tot Installation Photos
Below are photos of tht Tiny Tot installation.
 |
| I had to cut a six inch dia. hole for the Navigator built bronze thru hull for the pipe. Shown is the cloverleaf pipe cap. |
 |
| Here is a closer look at the well made bronze thru hull. |
 |
| I placed it on the forward sette, so I made it easily removeable. The long pipe provides great radiant heat and nice draft. |
 |
| Close up of the Tiny Tot. I will bolt it to the tile and hinge the two tile pieces so I can fold them together for storage. |
 |
| I used a stainless steel band off of a fernco coupling to attach the pipe to the thru hull. I can loosen it and slide it down over the pipe to remove the stove easily. I also used two 45 degree pipe fittings in order to accomodate the angled roof. One is used to below the roof and one above the roof, keeping everything nice a plumb. This allowed me to mount the bronze thru hull flush with the roof without having to build a wooden block to mount it on. This way it is less obtrusive when the pipe is put away and eliminate another possible leak source. |
Monday, December 12, 2011
Tiny Tot Heater
I have just installed a Tiny Tot charcoal heating stove and I love it. I set it up so I could easily remove it and stow it because I located it on the forward sette and I will not be sailing in cold climates all that often. I installed a Navigator built bronze thru hull for the stove pipe and it can easily be plugged. It is a beautiful piece of hardware. The stove creates a cozy atmosphere, heats the area nicely, and gives off just enough aroma to please. Pictures to come.
Friday, November 25, 2011
Bilge Pumps and Anchor System
After reading Euan's post about his anchor setup, I rethought (I am bad about that) my system and decided to set it up like Euan's. It wouldn't take much effort and I figured the benefits would be worth it. I raised my windlass up 2.5 inches on a teak block, drilled a 2 inch hole in my chain locker hatch, mounted a hawse pipe in the hole, and bolted a roller in front of the hawse pipe. It works really well with very smooth operation with no hangups. If one should occur, everything is accessible at the windlass. Pics below:
I finished the bilge pump setup. I installed two electric bilge pumps, one 1100 gal/min primary which is mounted on the bilge floor(actually I bonded a false floor on in the bilge made of g10 frp and mounted all screws and bolts to it for attachment of pumps), a 3800 gal/min secondary pump mounted 3 inches above the bilge floor in case the primary gets overwhelmed, and a manual pump with handle in cockpit. Each pump has its own thru hull and siphon loop. The only problem I have with the system is that in a situation where the primary fails, and the secondary kicks in, the back flow of water from the filled bilge hose into the bilge after the secondary kicks off will cause the secondary pump to cycle on and off continuously. Not good. I don't want to put check valve in the system but may have to. Pics below.

 |
| Anchor setup |
 |
| The chain is led forward over the roller and into the chain locker. I can also stow the chain under the forward berth on longer passages. There is a fuel fill cap under the windlass for getting the chain under the forward berth. |
 |
| I can access the locker by engaging the chain stopper on anchor platform, unhooking the chain from the windlass, and opening the hatch. |
 |
| The chain locker hatch open. |
I finished the bilge pump setup. I installed two electric bilge pumps, one 1100 gal/min primary which is mounted on the bilge floor(actually I bonded a false floor on in the bilge made of g10 frp and mounted all screws and bolts to it for attachment of pumps), a 3800 gal/min secondary pump mounted 3 inches above the bilge floor in case the primary gets overwhelmed, and a manual pump with handle in cockpit. Each pump has its own thru hull and siphon loop. The only problem I have with the system is that in a situation where the primary fails, and the secondary kicks in, the back flow of water from the filled bilge hose into the bilge after the secondary kicks off will cause the secondary pump to cycle on and off continuously. Not good. I don't want to put check valve in the system but may have to. Pics below.
 |
| Bilge pumps mounted to false floor |
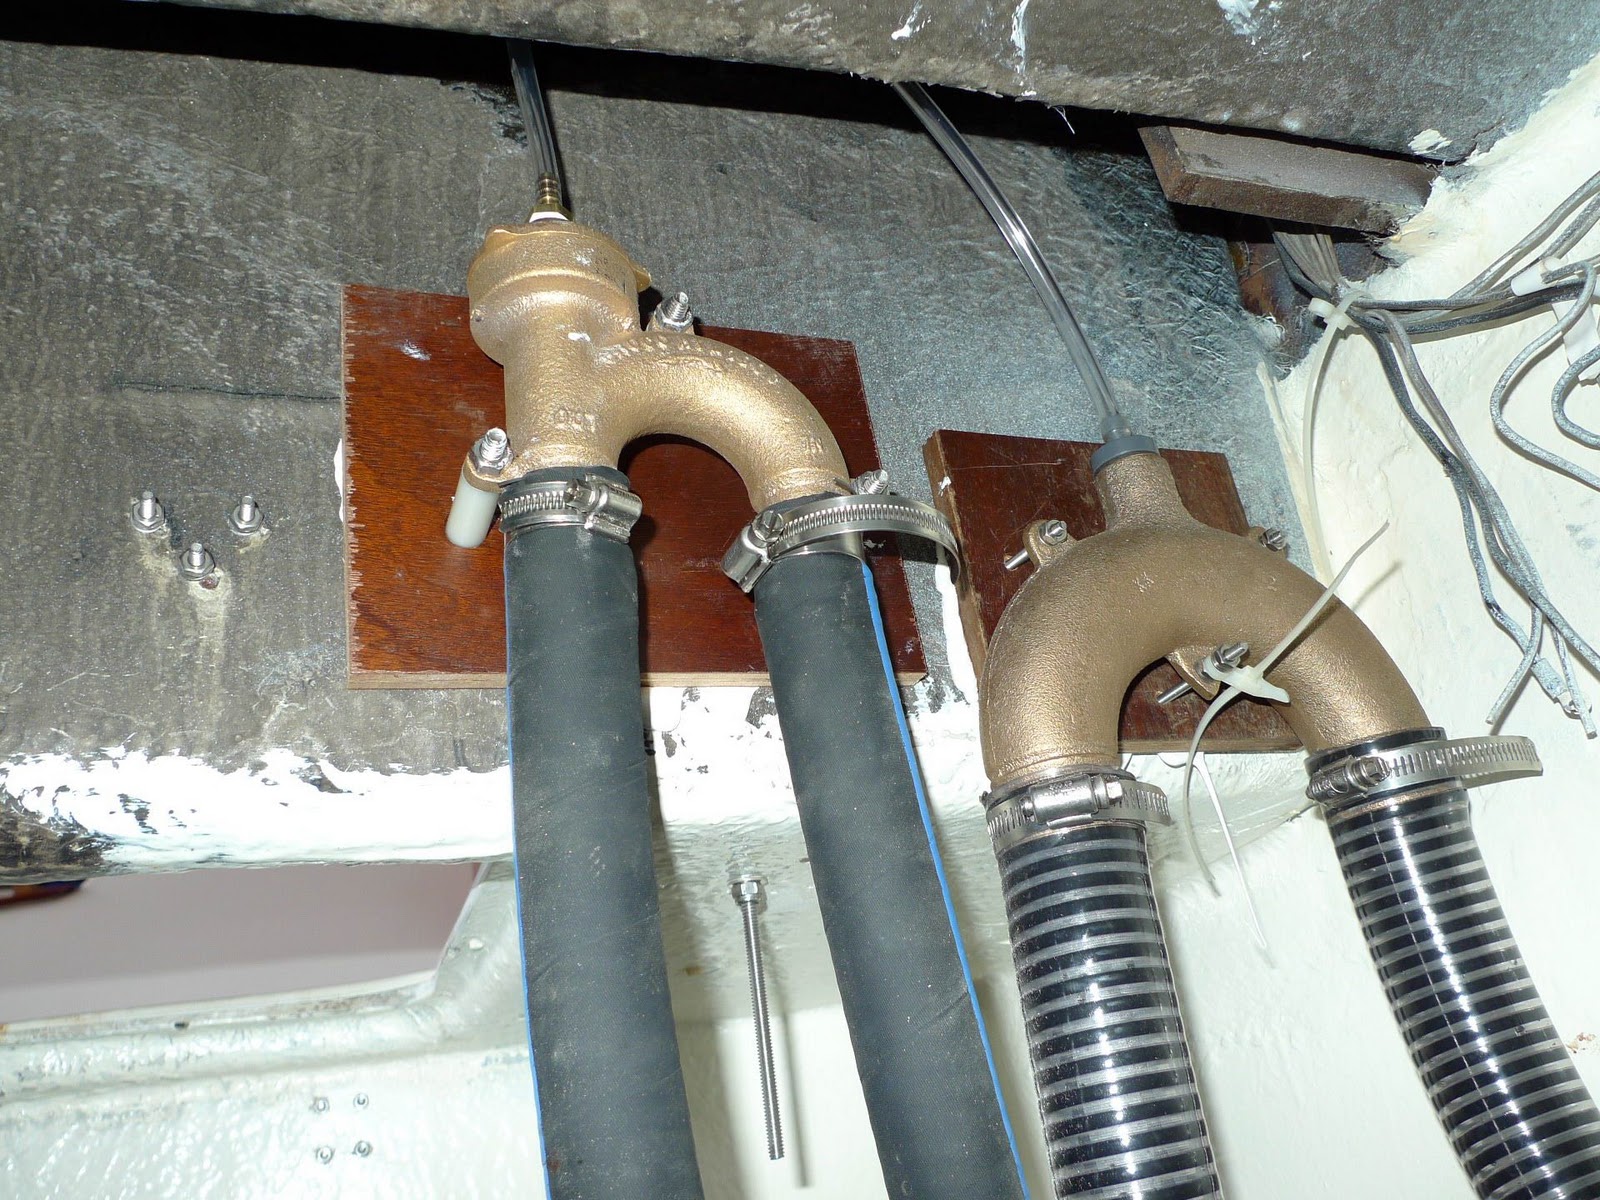 |
| Siphon loop for each pump. The siphon vents are connected to each other with a 3/16 inch hose. |
 |
| Manual whale pump mounted with handle led to cockpit. |
 |
| I used a fuel fill cap to cover the hole for the manual pump handle. It makes for a neat and water tight installation. |

Wednesday, November 23, 2011
To do list


Subscribe to:
Posts (Atom)