Hallberg Rassy Rasmus 35

An Old Classic
Thursday, March 8, 2012
Progress But Slow
I have been sidetracked a bit lately on other jobs but I have been managing to make slow progress on mounting solar panels, welding the ss dodger frames, painting hard top, and finalizing design for the the CapeHorn windvane system. As soon as I finish with this list I will order the engine. Pics coming soon on the above mentioned installations.
Wednesday, February 8, 2012
Euans Hard Top Pics
Jim,
Below are Euan's hard top pics he had kindly sent me. I will post my hardtop design in detail when finished.
Cheers
Pat


Below are Euan's hard top pics he had kindly sent me. I will post my hardtop design in detail when finished.
Cheers
Pat


Tuesday, February 7, 2012
Aero's Mast and Rigging Pics
 Here are some Pics of Aero's Mast and rigging.
I apologize in advance for the lack of photo quality.
Originally I wanted to lead the halyards to the cockpit. After less than six months, I'm accustomed to the mast mounted winches so that is now a low piority. The halyards are steel cable.
 |
My slab reefing system is very simple. Two lines are secured aft on the boom, run up through the reef grommets and down to a pair of blocks, lead forward to a double block (barely viewable in the pic to right) at the mast, up through the forward reef points, and tied off on the mast mounted cleat.

You can see the inner shrouds attached to the mast at the spreader.
The spreaders attach to the mast brackets with pins. They make too much noise rattling in the wind while moored, so on my first trip up I'll tape them.

The swage terminated upper shrouds fit into keyed brackets on the mast.
Fortunately there is no work to do up there yet (knock on wood). My Wind vane is off by a couple degrees. The PO installed a tri colored light just before I purchased :)
If anyone needs pics of anything specific or better detail let me know.
BR
JK
Saturday, February 4, 2012
Making Progress on the Hard Top
 |
| This is a pic of the hardtop after laminating the two 1/4 inch okoume plywood togeter |
 |
| This shows the hardtop after glassing with three layers of 9 oz. cloth, fairing, and coating with an epoxy to seal. |
Saturday, January 21, 2012
Hard Top for Rasmus
I have started building the hard top for the Rasmus out of ply. I am going to build it in place for the most part. I was going to make a frame out of stainless steel but decided to go with plywood/epoxy/glass composite. I thought the steel frame would add too much weight up top. After looking at measurements sent by Euan and pictures, I have come up with my best guess at the hardtop radius. I am going with a hardtop radius of 122 inches. I will make the top out of 2 layers of 1/4 inch okouma ply bonded with epoxy. Below is the dimensions for making the jig necessary for making the top with a 122 inch radius curve. If anyone out there thinks I am off base on this I would like to hear from you.
Cheers
Pat

Cheers
Pat

Wednesday, January 4, 2012
Boat Work Can Be Dangerous

Monday, January 2, 2012
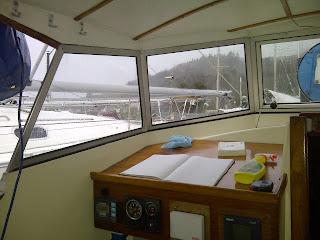
My stove & other jobs
the bulkhead in the heads.

I use diesel from the ships tank and transfer it across to the header tank on a batch basis.
Also I have just fitted a new battery charger which is both a really neat unit and is proving quite
an impressive performer. My batteries are under the seat on the aft end of the settee, so the chosen location is really neat as you can monitor performance etc.

The unit is an M100 - full spec on attached link
Subscribe to:
Posts (Atom)